How to File GSTR 3B on GST Portal?
Introduction
Filing GSTR 3B is an important aspect of GST compliance. All registered taxpayers need to file it. Normal taxpayers have to file it monthly whereas QRMP taxpayers have to file it quarterly. However, as important as it is to file, it can also be extremely confusing how to go about it! The GSTR 3B filing process is straightforward, but it can be a little overwhelming for those who are new to it. Well, don’t worry. In this article, we will guide you through the process of how to file GSTR 3B on the GST portal. With our guide, you can file your GSTR-3B return online in 15 simple steps!
Process of filing GSTR 3B on the GST portal
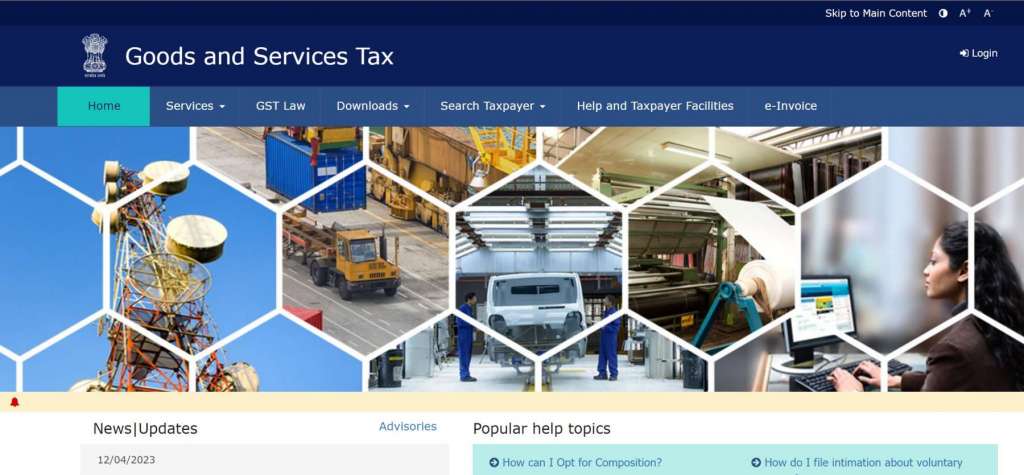
Step 1: Log in to the GST Portal
To file GSTR 3B, you need to log in to the GST portal with your credentials. If you are not registered, you need to register first before proceeding. Once you log in, you will see the Dashboard.
Step 2: Select ‘Returns Dashboard’
From the dashboard, click on the ‘Returns Dashboard’ under the ‘Services’ tab.

Step 3: Select the Financial Year and Period
On the ‘Returns Dashboard,’ select the Financial Year and Period from the drop-down menus for which you want to file GSTR 3B. Click on the ‘SEARCH’ button.
Note: As a quarterly return filer, you are required to file Form GSTR-3B for the last month of the quarter, like June, September, etc. However, if you select M1 or M2 of the quarter, you will not have the option to file Form GSTR-3B.

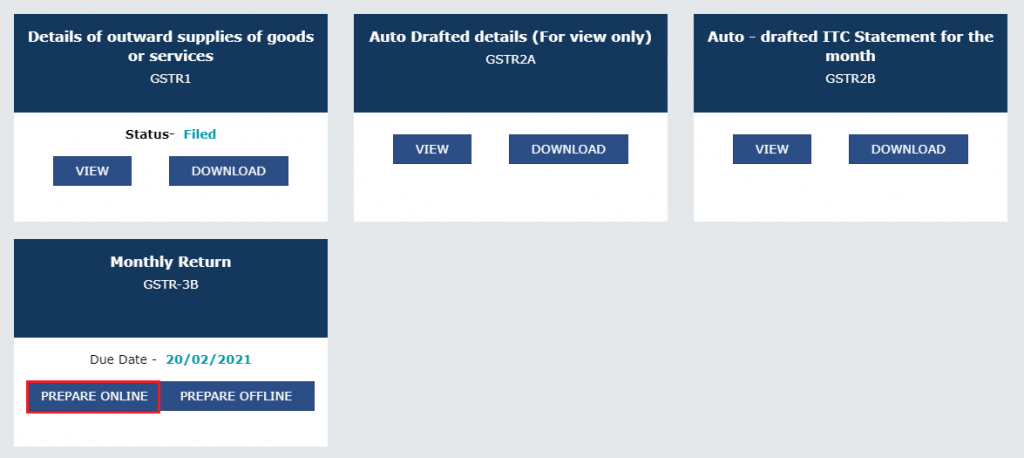
Step 4: Click on the ‘Prepare Online’ button
Once you select the month and year, you will be displayed the ‘File Returns’ page. Go to the ‘Monthly Return GSTR-3B’ block and click on the ‘Prepare Online’ button to proceed with the GSTR 3B filing process.
Step 5: Fill in the Questionaire
After clicking on the ‘File Return’ button, a page with a set of questions will open. Choose “No” to whether you want to file NIL return and click on the ‘Next’ button for the next set of questions. You need to fill in the questionnaire accurately. If you’re interested in filing a Nil GSTR-3B return, you should check out our blog: Process to file NIL GSTR 3B on GST Portal

Step 6: Close System Generated GSTR-3B summary
At this point you will be shown a system-generated summary of your GSTR-3B click on close to move to the next step

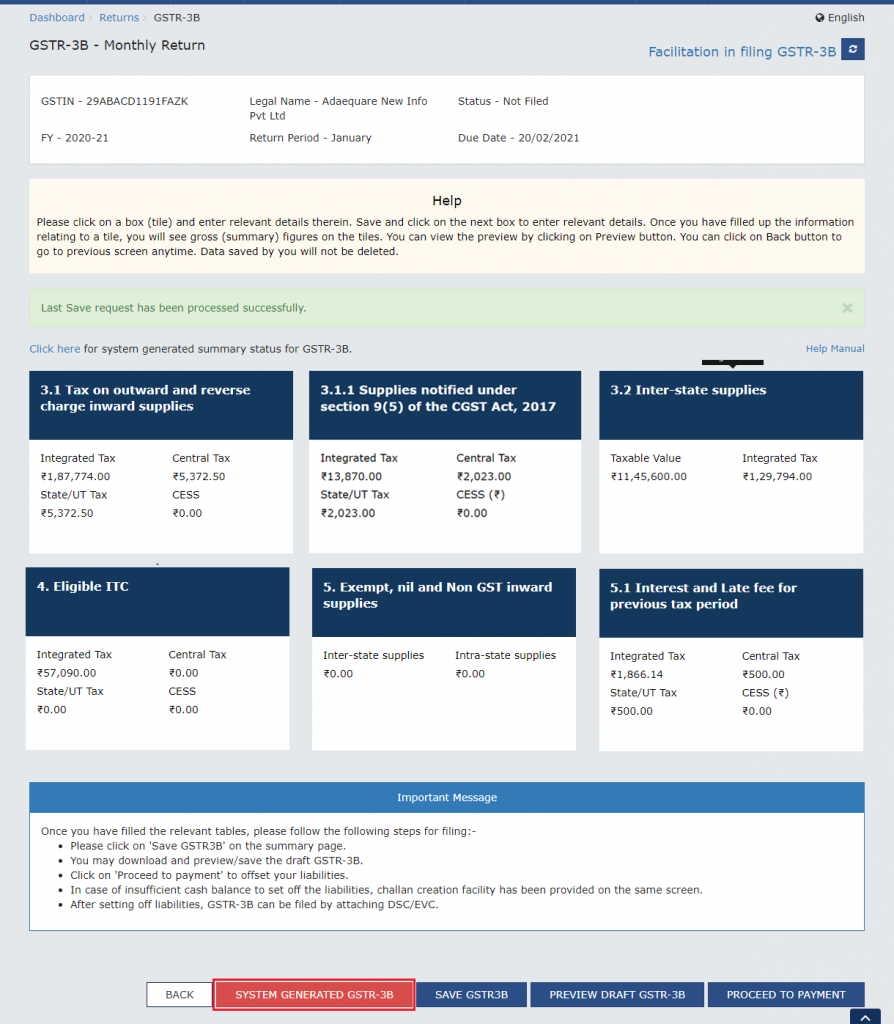
Step 7: GSTR-3B Monthly Return Page
You will now be at the GSTR-3B Monthly return page. Here you will be shown a summary of all the tables within GSTR-3B with auto-populated data. Click on ‘System Generated GSTR-3B’ to look at the data from GSTR-1 and GSTR-2B that have given rise to the auto-populated data.
To change data in any of the tables
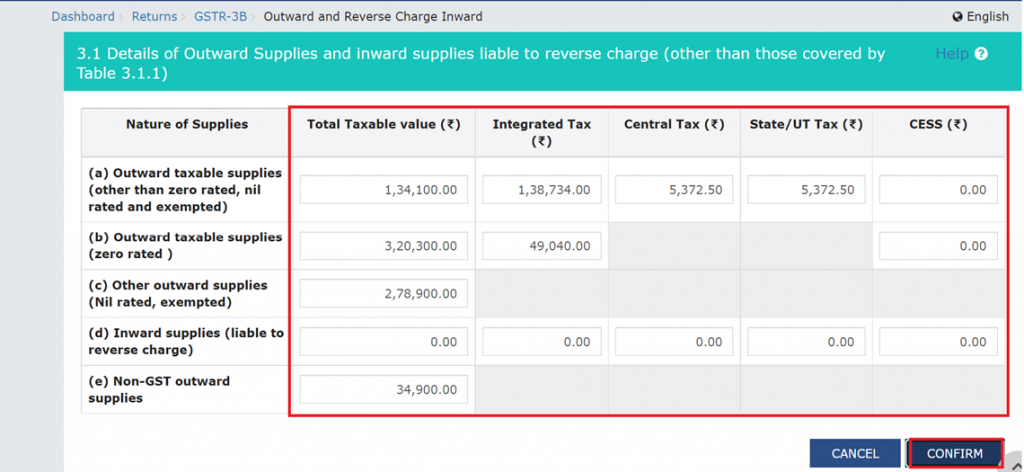
If you want to change any of the auto-populated data in any of the tables, all you have to do is click on the table. This will show you an expanded editable version of the table. All you have to do is edit the relevant data and click the ‘Confirm’ button.
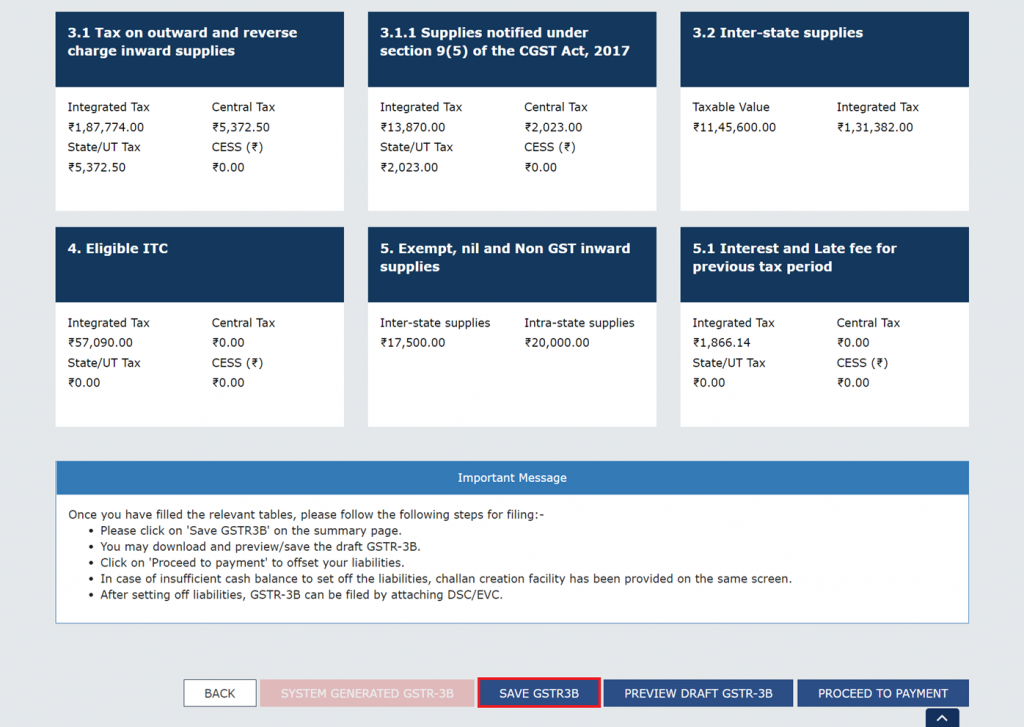
Step 8: Save GSTR-3B
Once you’re pleased with the data in the table, you need to click on ‘Save GSTR3B’ button to save your data.
Note: You can also click on the ‘Preview Draft GSTR-3B’ button after clicking on the ‘Save GSTR3B’ button, for a PDF version of your GSTR-3B form.
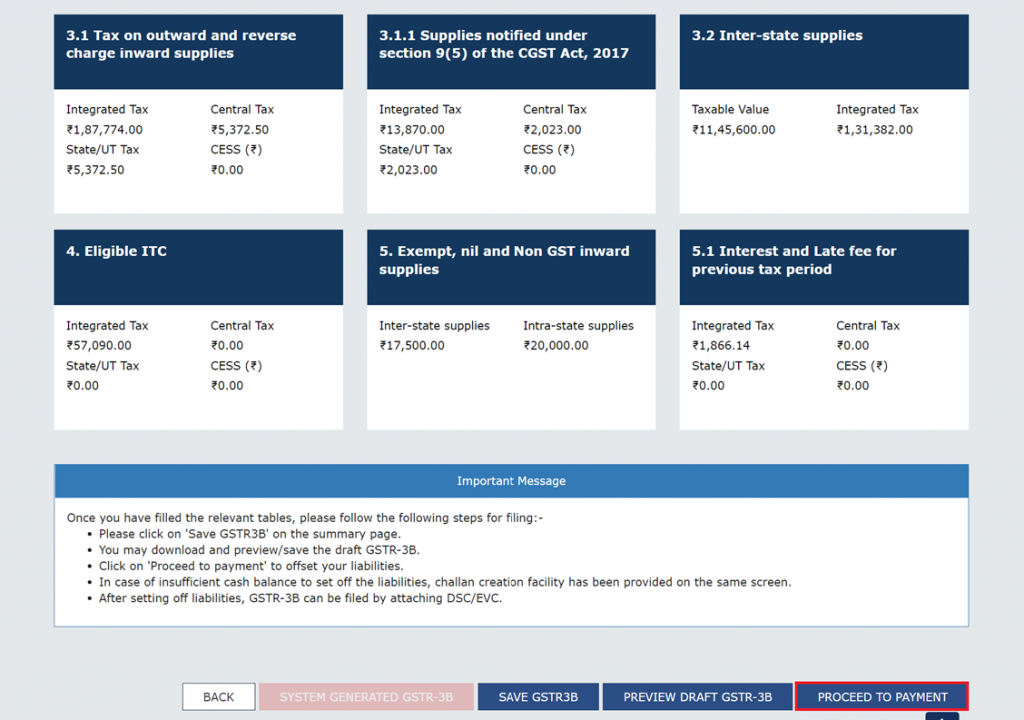
Step 9: Make Payment
The final step is to make the payment of tax. You have to click on the ‘Proceed to Payment’ button. (For QRMP taxpayers, ‘Payment made in Quarter’ button displays instead)
You can make the payment through the GST portal using any of the available payment modes.
Step 10: Payment Ledger
Upon clicking ‘Make Payment’ you are shown a ledger with all your Input Tax Balance.
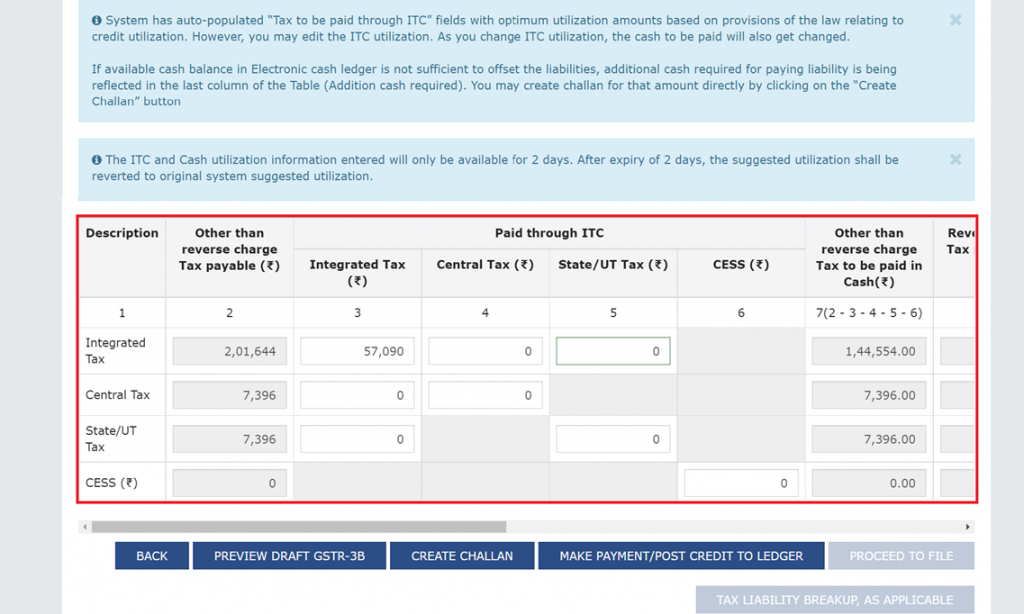
Step 11: Make Payment to Ledger
Click on the ‘Make Payment/Post Credit to Ledger’ button to make a payment. If you did not have enough In put Credit in your ledger, you need to create a challan and make a payment for the rest of the amount. To learn how to generate a challan for GSTR-3B, you should check out our blog:

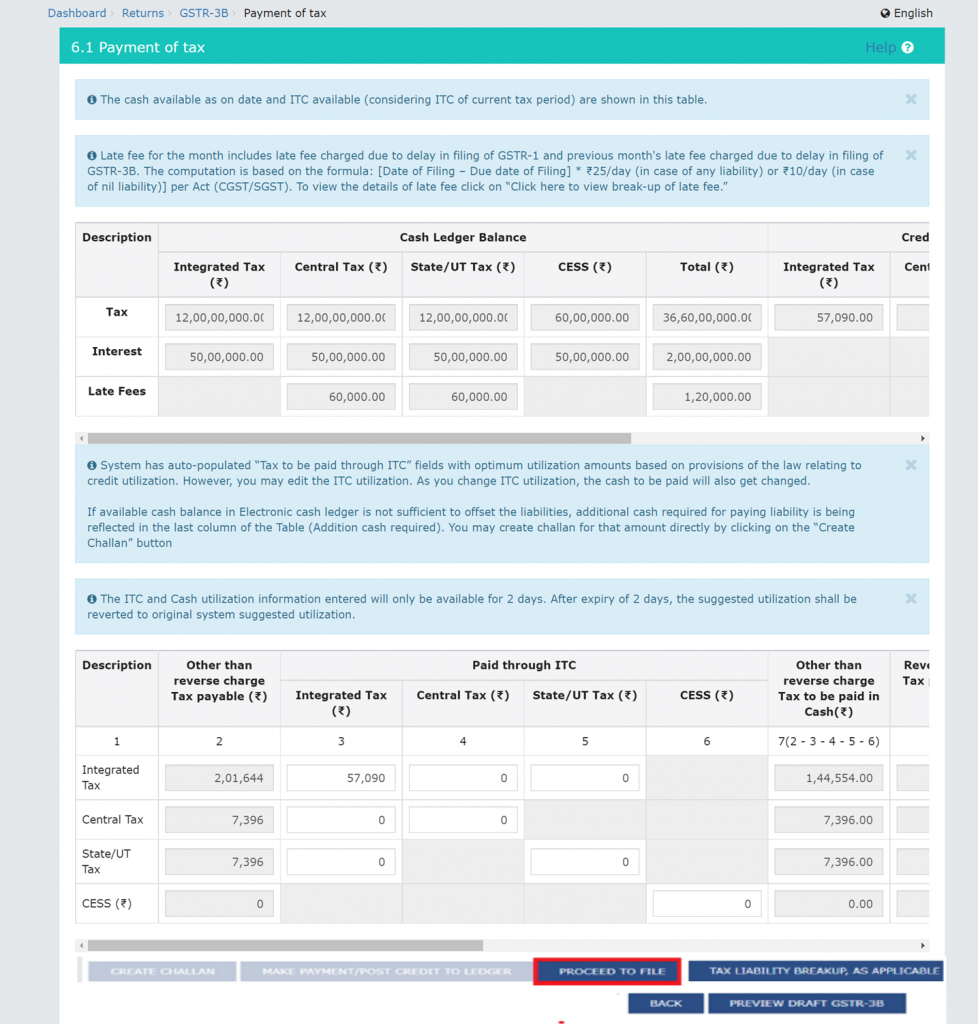
Step 12: File GSTR-3B
Finally, click on the ‘Proceed to File’ button to file your GSTR-3B return.
Step 13: Verification
The penultimate step is to verify your filing. You have to pick either ‘File GSTR-3B with EVC’ or ‘File GTSR-3B with DSC’, based on your preference.

Step 14: Proceed to verification
You next have to click on the proceed button to go ahead with verification.

File GSTR-3B with EVC
If you choose to file with EVC, you have to do an OTP verification.

File GTSR-3B with DSC
If you choose to file with DSC, you will be shown a page where you have to choose your certificate and click on the ‘Sign button’
Step 15: Filing Successful
And that’s it. You’ve successfully filed your GTSR-3B return! After this, you can track your GST Return status on the Portal.

How to file GSTR-3B using the offline tool
You can only file GSTR 3B online, however, you can use the offline Excel tool to input the necessary data that you might have as physical copies. It can help you prepare a JSON file for then for uploading on the GST portal. Always ensure that you are downloading and using the latest version of the GSTR-3B offline utility. With this tool’s help, registered individuals can conveniently file their monthly returns and comply with the GST regime’s regulations. A step-by-step guide to preparing Form GSTR-3B using the offline tool is provided below:
Guide for preparing Form GSTR-3B using the offline tool
First, follow these simple steps to download and open the offline tool for GSTR-3B:
- Step 1: Firstly, visit the GST portal.
- Step 2: Next, navigate to Downloads > Offline Tools > GSTR-3B Offline Utility.
- Step 3: After that, click on ‘Download’ and then ‘Proceed’.
- Step 4: Finally, extract the contents of the downloaded zip file. Then, navigate to the extracted files’ location and open the excel utility.
Next, to use the tool:
- Step 1: Firstly, to enable macros, click on the ‘Enable Editing’ button followed by the ‘Enable Content’ button. You can clear all details by clicking on the ‘Clear All’ button.
- Step 2: After that, go to the ‘GSTR-3B’ worksheet. This sheet contains all the tables of Form GSTR-3B for you to enter data.
- Step 3: Once that’s done, enter your taxpayer details, such as GSTIN, year, legal name of the registered person, and the month of return filing.
- Step 4: Fill in the following tables with relevant data:
- Table 3.1 Details of outward supplies and inward supplies liable to reverse charge: Enter applicable details. Once you enter amounts under ‘CGST’, it auto-populates the ‘SGST’ values. If the SGST values are not equal to the CGST values, you can change them on the portal.
- Table 3.2 Of the supplies shown in 3.1(a) above, details of inter-state supplies made to unregistered persons, composition taxable persons, and UIN holders: Enter details as applicable. The relevant state/UT can be selected from the drop-down list in the ‘Place of Supply’ column.
- Table 4 Eligible ITC: Enter tax-wise details of ITC availed and to be reversed. The utility auto-populates the net eligible ITC row.
- Table 5 Values of exempt, nil-rated and non-GST inward supplies: Enter tax-wise details of inward supplies on which GST was not levied.
- Table 5.1 Interest & late fee payable: Enter the interest amount.
- Step 5: Click on the ‘Validate’ button after entering the details. If validation is successful, then the following message is displayed: ‘Sheet validated. Please proceed to generate JSON file.’ If validation fails, then a relevant error message is displayed.
- Step 6: Finally, after validation is successful, click on the ‘Generate File’ button. This creates a JSON file for uploading on the GST portal.
Finally, to upload the generated JSON file of Form GSTR-3B, follow these steps:
- Step 1: Log in to the GST portal.
- Step 2: Navigate to Services > Returns > Returns Dashboard. Select the relevant financial year and return filing period and click on ‘Search’.
- Step 3: On the GSTR-3B tile, click on the ‘Prepare Offline’ button.
- Step 4: On the upload page, click on the ‘Choose File’ button. Navigate to the location of the JSON file generated earlier and click on the ‘Open’ button. The uploaded JSON file will be validated and processed. It will display the status of the same.
- Step 5: After the processing of the JSON file, navigate back to the returns dashboard page. On the GSTR-3B tile, click on the ‘Prepare Online’ button. Verify the details uploaded.
If everything is in order, then click on the ‘Submit’ button and follow the steps mentioned on the portal. By following these steps, you can successfully file your GST return using Form GSTR-3B.
Pro Tip: It can be helpful to Download your GSTR-3B return. That is because a copy of your filing may be needed in the future.
Conclusion
In conclusion, filing GSTR 3B is an essential aspect of GST compliance. The GSTR 3B filing process is straightforward, and by following the steps mentioned above, you can file GSTR 3B online with ease. Hence, it is important to ensure that you file your returns on time and make the payment of tax to avoid any penalties or fines.
Frequently Asked Questions

Monjima Ghosh
Monjima is a lawyer and a professional content writer at LegalWiz.in. She has a keen interest in Legal technology & Legal design, and believes that content makes the world go round.
