How to pay Income tax through Net-banking
Introduction
Paying income tax is an essential responsibility for every citizen. To make the process convenient and efficient, the Income Tax Department of India provides the option to pay taxes and file ITR online through the e-portal. It has various options to e-pay taxes, one of them being net-banking. This article will guide you through the step-by-step process of paying income tax using net banking, ensuring a hassle-free experience.
Step-by-step process of paying income tax using net banking
Without Login Method
If you prefer to pay income tax without logging in to the e-Filing portal, you can follow these steps:
Step 1: Visit the e-Filing Portal
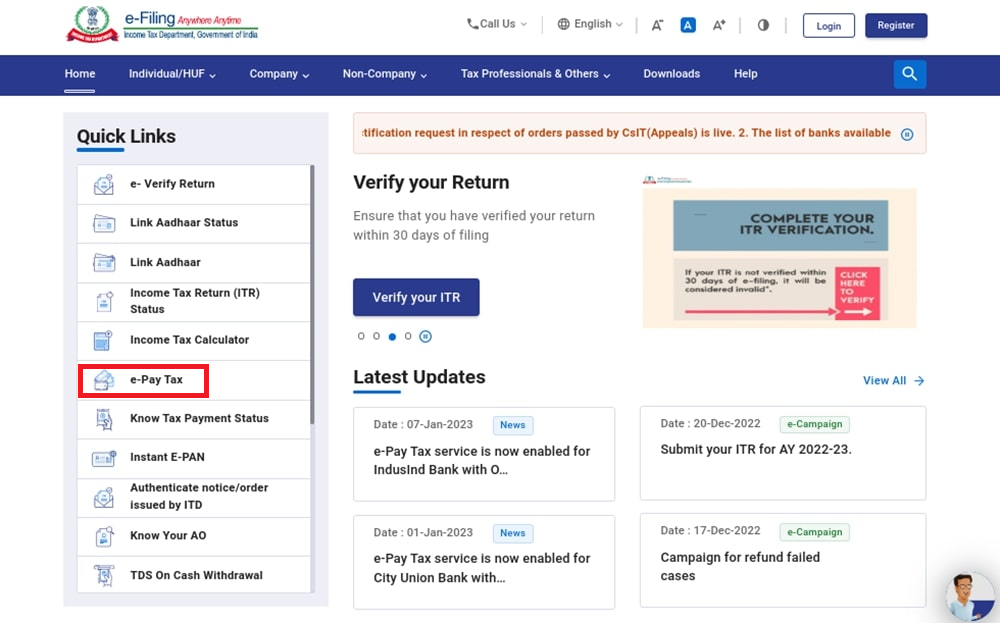
Go to the official e-Filing portal and click on the “e-Pay Tax” option.
Step 2: Provide Required Details
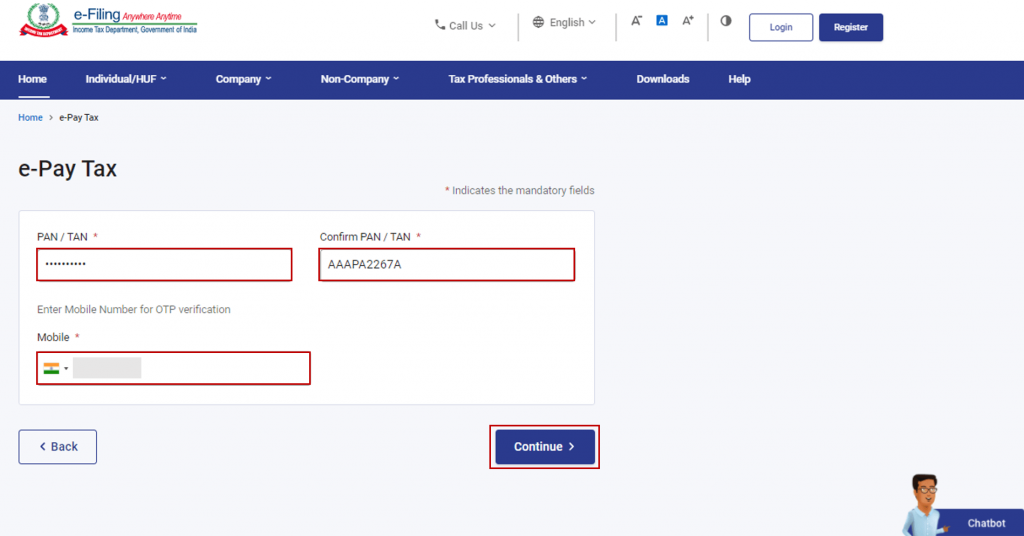
On the e-Pay Tax page, enter the necessary details as prompted and click “Continue.”
Step 3: OTP Verification
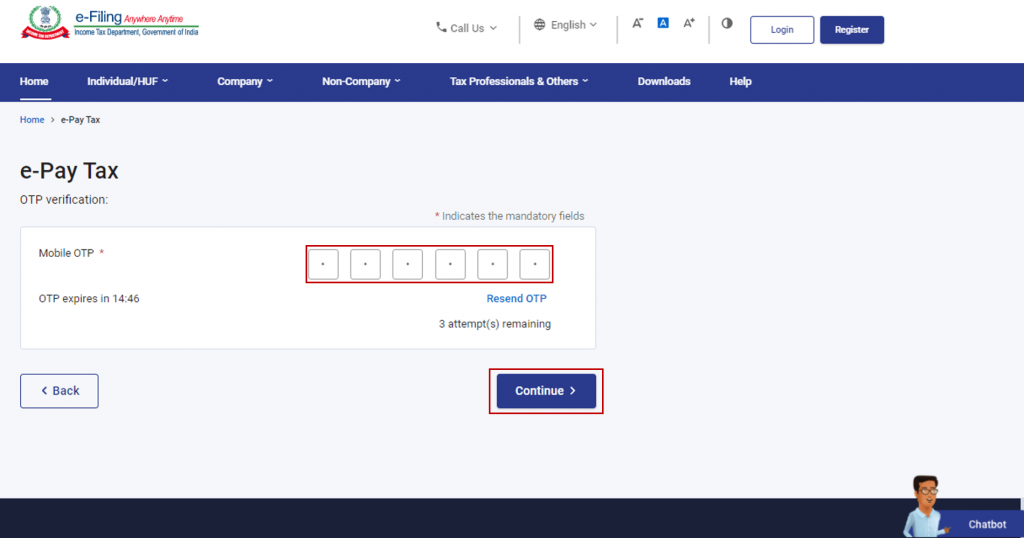
You will receive a 6-digit OTP (One-Time Password) on the mobile number provided in the previous step. Enter the OTP on the verification page and proceed.
Step 4: Confirmation Message
After successful OTP verification, a confirmation message will show. It will display your PAN/TAN and masked name. Once that’s done, click “Continue” to proceed.

Step 5: Choose the Relevant Tax Payment Category
After that, on the e-Pay Tax page, select the applicable tax payment category based on your requirements.

Step 6: Provide Payment Details
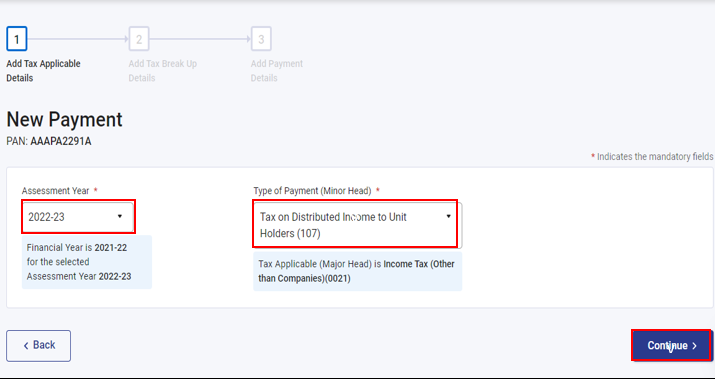
Enter the assessment year and type of payment details as required. Click “Continue” to proceed.
Step 7: Add Tax Breakup Details
On the “Add Tax Breakup Details” page, enter the breakup of the total amount to be paid as tax. Review the information and click “Continue.”
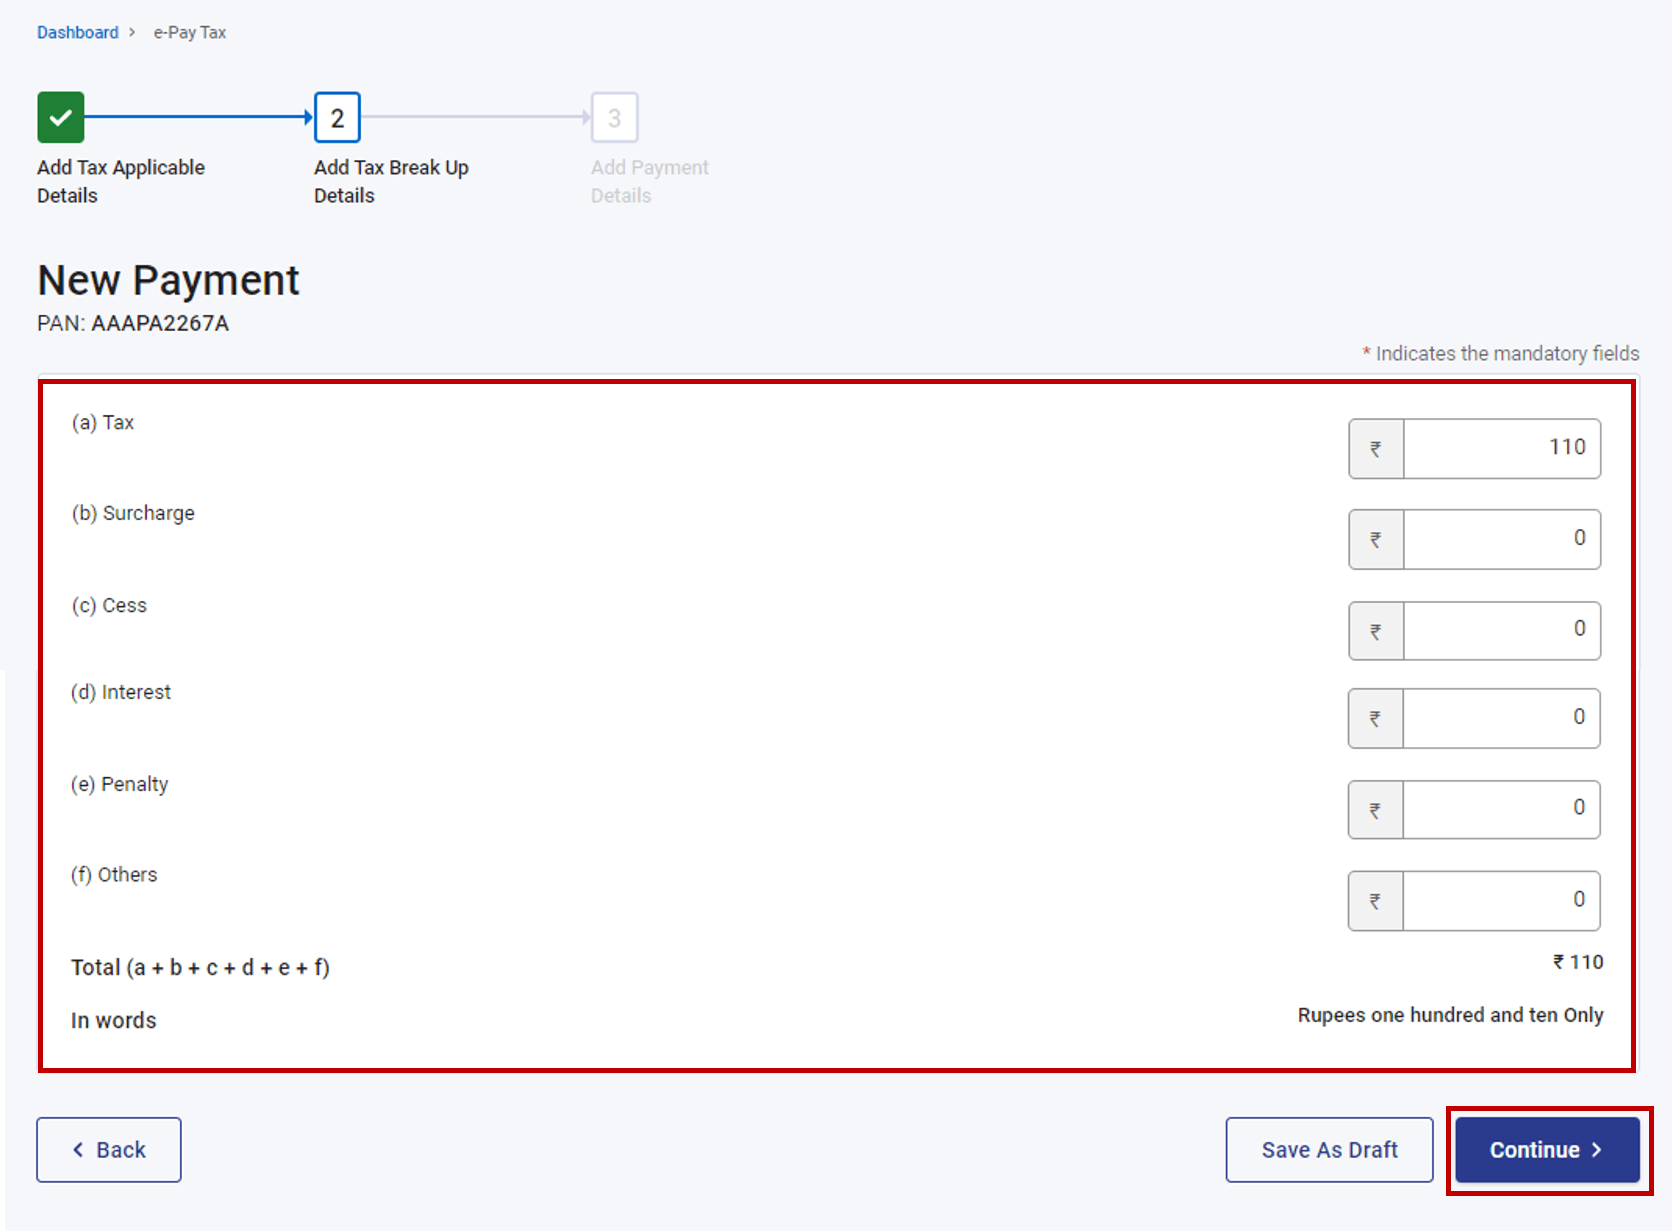
Step 8: Select Net Banking as the Payment Mode
The screen will show many payment options such as pay via debit card, pay income tax via NEFT/RGST, etc. Choose net banking as the preferred payment mode. Select your bank from the list of options provided.
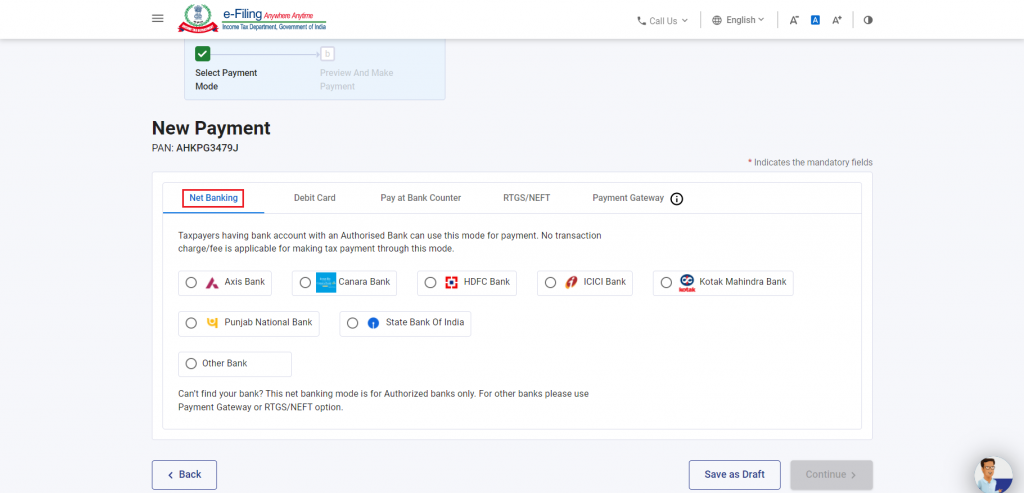
Step 9: Preview and Make Payment
Finally, review all the details and tax breakup information on the “Preview and Make Payment” page. Once verified, click “Pay Now.”
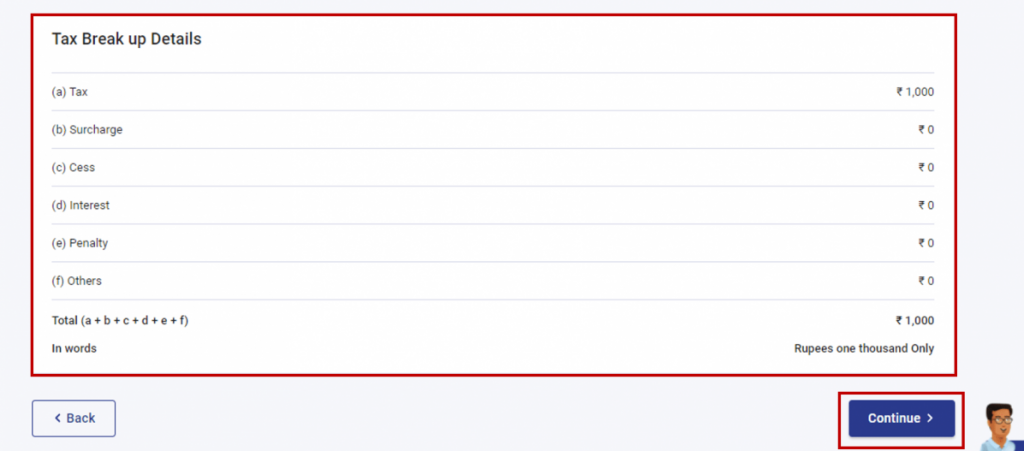
Step 10: Complete the Payment Process
Read and accept the Terms and Conditions before clicking the “Submit to Bank” button. After that, you will be redirected to your bank’s website. There you need to log in using your net banking credentials and complete the payment.
Note: After a successful payment, you will receive a confirmation email and SMS on the registered email ID and mobile number. Moreover, it is recommended to download the Challan Receipt for future reference.
With Login Method
Step 1: Log in to the e-Filing Portal
Firstlt, to initiate the tax payment process, log in to the e-Filing portal using your User ID and Password. If you don’t have an account, you can register for one on the portal.
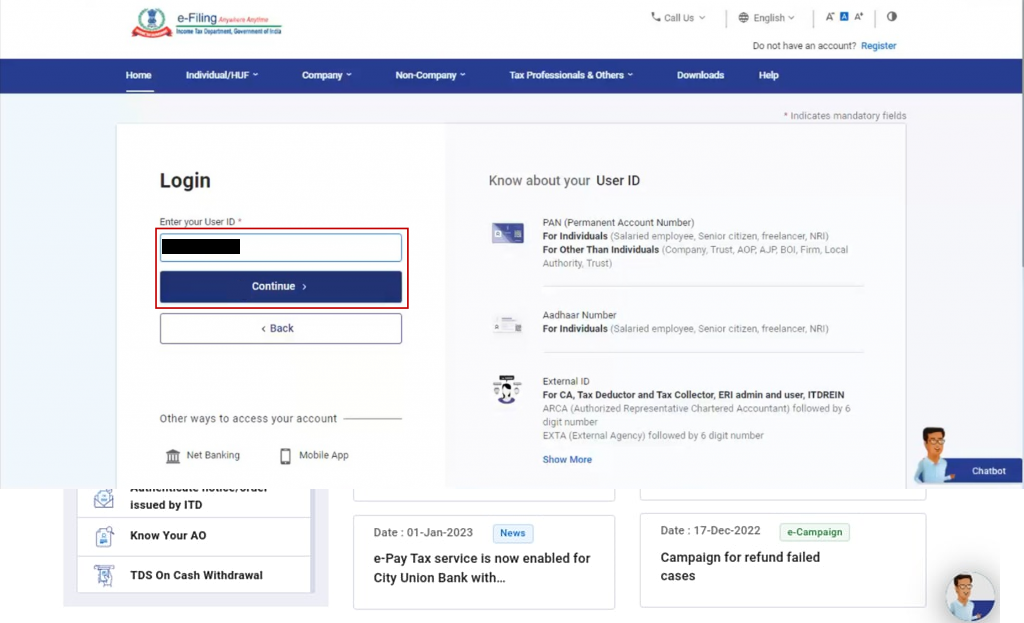
Step 2: Access e-Pay Tax
Once logged in, navigate to the Dashboard and click on “e-File” followed by “e-Pay Tax.” After that, you will be directed to the e-Pay Tax page, where you can initiate online tax payments.

Step 3: Choose the Tax Payment Option
Moving forward, on the e-Pay Tax page, click on the “New Payment” option to begin the tax payment process. It is important to note that tax payment through net banking is currently available only through authorized banks.

Step 4: Select the Appropriate Tax Payment Tile
After that, you will be presented with different tax payment options. Choose the relevant tax payment tile based on your requirements.

Step 5: Select the Assessment year and type of payment
Next, select the necessary Assessment year for Tax Payment as well as the type of tax payment that you’re going for.

Step 6: Provide Payment Details
On the “Add Tax Breakup Details” page, enter the breakup of the total amount to be paid as tax. Additionally, ensure accuracy and double-check the details before proceeding.

Step 7: Choose Net Banking as the Payment Mode
In the “Select Payment Mode” section, opt for net banking as your preferred payment mode. A list of authorized banks will be provided. Select your bank from the options available.

Step 8: Preview and Verify Details
On the “Preview and Download Mandate Form” page, review all the details and tax breakup information to ensure accuracy. Once verified, accept the Terms and Conditions and click on the “Submit to Bank” button.

Step 9: Payment Confirmation
You will be redirected to your bank’s website. There you can log in using your net banking credentials to complete the payment process. Finally, after a successful transaction, you will receive a confirmation email and SMS on the registered email ID and mobile number.
Note: It is important to save the Challan Receipt for future reference. You can access the payment details and Challan Receipt under the “Payment History” tab on the e-Pay Tax page post-login.
Conclusion
Paying income tax through net banking offers convenience and efficiency, saving you time and effort. By following the step-by-step guide provided in this article, you can easily make your income tax payment online. Remember to verify all the details before proceeding and keep the payment confirmation and Challan Receipt for future reference.
Frequently Asked Questions

Monjima Ghosh
Monjima is a lawyer and a professional content writer at LegalWiz.in. She has a keen interest in Legal technology & Legal design, and believes that content makes the world go round.
